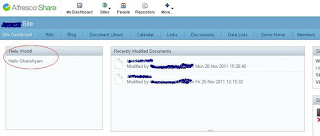
To create a custom dashlet, its easy in alfresco share.All we need is following files for creating our hello world dashlet.
Go to our extension area \tomcat\shared\classes\alfresco\web-extension\site-webscripts\org\alfresco\components\dashlets & create following files.
1. hello-world.get.config.xml
3.hello-world.get.html.ftl
4.hello-world.get.js
5. hello-world.get.properties
Once you complete all above steps, restart alfresco server. Go to specific site -> Click on Customize dashboard button. you will find like below:
Add it and Click OK.
Go to our extension area \tomcat\shared\classes\alfresco\web-extension\site-webscripts\org\alfresco\components\dashlets & create following files.
1. hello-world.get.config.xml
<hello-world>
   <greeting>hello</greeting>
</hello-world> <webscript>
<shortname>Hello World</shortname>
<description>Displays Hello World text to the user</description>
<family>dashlet</family>
<url>/components/dashlets/hello-world</url>
</webscript> 3.hello-world.get.html.ftl
 <div class="dashlet">
   <div class="title">${msg("header")}</div>
   <div class="body scrollableList">
    <div class="detail-list-item first-item last-item">
     <span><#if greeting=="hello">${msg("label.hello", user.firstName)}<#else>${msg("label.goodbye", user.firstName)}</#if></span>
    </div>
   </div>
</div> 4.hello-world.get.js
function main()
 {
   var s = new XML(config.script);
   var greeting = s.greeting;
   // Set the model object
   if (greeting == "hello")
   {
    model.greeting = "hello";
   }
   else
   {
    model.greeting = "goodbye";
   }
 }
main(); 5. hello-world.get.properties
header=Hello World!
 label.hello=Hello {0}
label.goodbye=Goodbye {0} Once you complete all above steps, restart alfresco server. Go to specific site -> Click on Customize dashboard button. you will find like below:
Add it and Click OK.


No comments:
Post a Comment